We begin by diving into the fascinating art of CJ Hendry. Hendry expresses having no formal art training and considers herself “not very creative.” Yet she’s a dedicated, innovative artist whose works are primarily hyper-realistic, large scale pencil drawings of (mostly) luxury objects that sometimes take 200 hours to complete. Working with pencil on paper her pieces are achieved through layers of what she refers to as scribbles. Watching her work (you can see some fun videos of her at work here: https://youtu.be/KB8vc9M4QWs and https://youtu.be/KixMpzhMS-o) students become awe-struck by the way her tireless pencil strokes beget such lifelike representations of real-life objects.
Description of the Unit – To celebrate Halloween, students chose a famous painting featuring any kind of portrait, such as one of Vincent van Gogh’s or Frida Kahlo’s self-portraits. They recreated the painting onto posterboard, cutting out the area with the face so that they could ultimately “wear” the painting as a Halloween costume!
This is one of my favorite art units to teach, because it involves one of my favorite art forms to practice: linoleum block printmaking. There is something so satisfying about carving through that soft linoleum block, watching the shavings curl off the blade. Students love this art form, too, and always request it every year (I offer it as an elective).
A snapshot of some necessary supplies for linoleum block printmaking
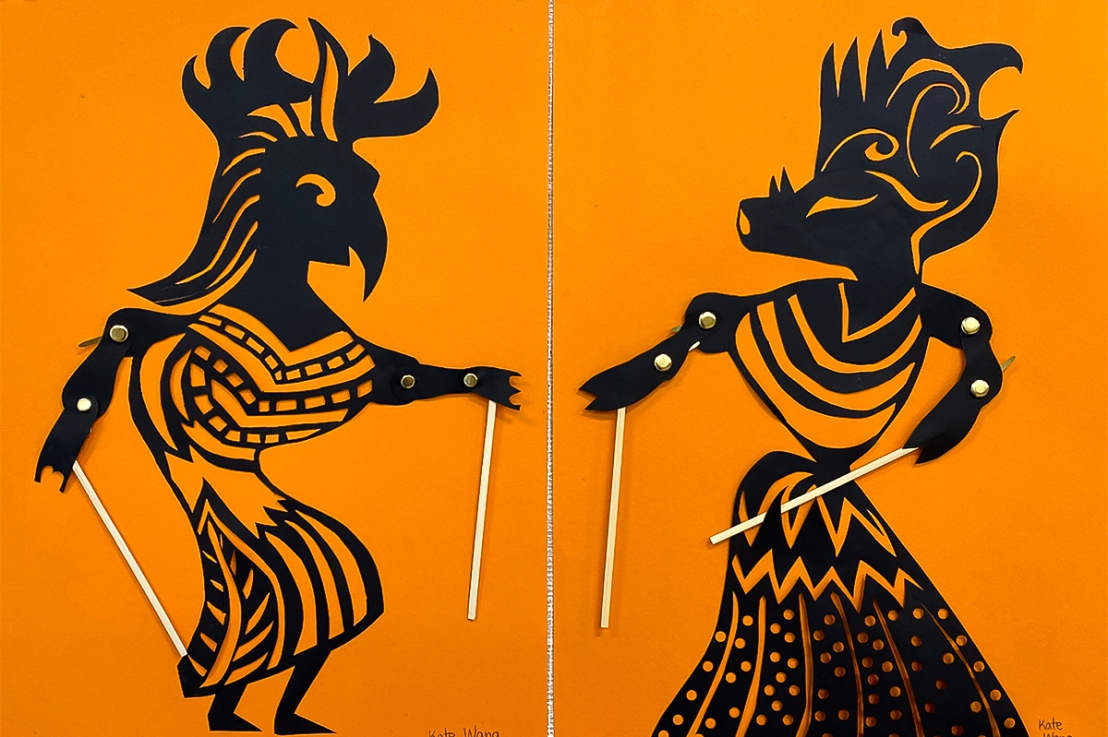
Description of the Unit – Students explore the fascinating shadow puppet art form from Indonesia known as Wayang Kulit. Students then create their own shadow puppets, taking particular care to carve patterns on the puppets’ costumes using negative space.
Wayang Kulit, the fascinating shadow puppet theater of Indonesia
Description of the Unit – Students will explore the ISO function on their digital cameras so as to understand how it affects exposure, practicing using it and all previously learned functions to take sharp, interesting nighttime photos.
Activity statement – ISO completes the basic triad of camera functions necessary to understand and manipulate your camera in order to get the shot you want. Our objectives are the following:
Understand what ISO means
Understand what the corresponding ISO would be for various light circumstances
Practice using different ISO’s and examining the results
Take at least one clear night image
What is ISO? With analog cameras, ISO represented the film’s sensitivity to light, which was rated via a number, such as 400. The more sensitive the film to light, the higher it’s rating, or number; in photography it was also referred to as the film being “faster”. Film with low ISO was typically used in bright, daytime settings, and so of course the higher ISO’s were used if it was overcast, night, or a darker indoor scene. There was always a compromise, however, as the higher the sensitivity, the grainier the film—meaning the image would actually look grainy and lack sharpness. Additionally, with analog cameras, whatever film sensitivity you were using you would be stuck with until the roll of film was all used.
With digital cameras, one can adjust the ISO at any time. However, if one is not actually using film, why is there still ISO? Well, to the best of my knowledge, when digital cameras first came out manufacturers co-opted ISO to reflect the sensor’s performance level under given light circumstances, so as to give photographers the same options as one once had on analog cameras, when adjusting the aperture and shutter speed just weren’t enough. As with analog cameras, higher ISO’s also produce more noise, however camera technology has been decreasing this outcome over the years.
So, on a digital camera, if your setting is in low light, your preferred aperture and shutter speed might not allow enough light to reach the sensor, and therefore you would need to opt for a higher ISO.
Now that students have had a few weeks to learn about and practice using shutter speed and aperture, I invite them to use them, along with ISO adjustments, to take sharp nighttime images. The images may also involve the use of motion of some kind to blur light. Students should consider either using a tripod, or setting their cameras on a steady surface to reduce the possibility of blur due to handholding the camera.
I love shooting at night, so I give students examples of my own photos and talk to them about the settings I used, the experience I had while shooting each image and what I learned with each.
As always, in class we go on a photo walk to continue to play with our camera’s settings. The nighttime photos will be the assigned homework.
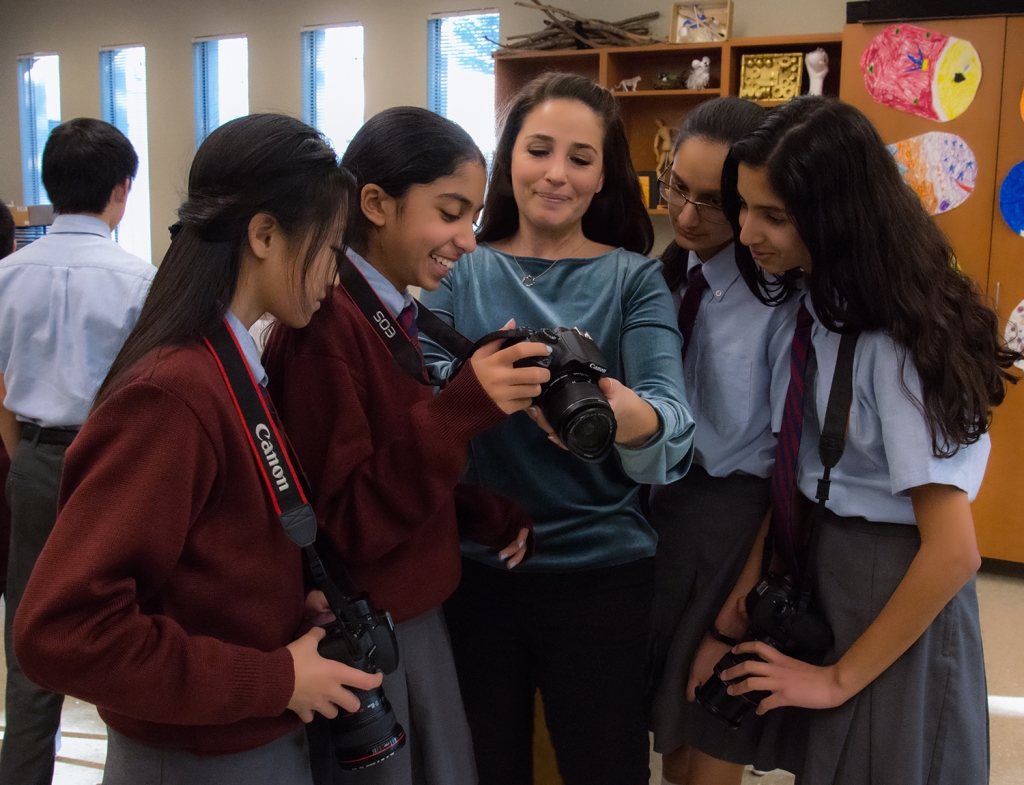
A student showing curious children her images while out on our class photo walk
Goals – Students should…
Understand:
What ISO is
How ISO affects exposure
Know:
When a high ISO would be used vs. a low one
Be able to:
Adjust the ISO setting on their cameras
Take an image at night that is sharp
Resources and materials –
A digital camera with manual settings
A memory card with enough space for the day’s photo excursion
Fully charged battery
Examples of photos highlighting the day’s lesson (shutter speed manipulation in this case)
Optional: a tripod for sharper nighttime images
Students were assigned the nighttime photography over winter break, so were fortunate enough to take images celebrating the holidays and new year’s eve.
Description of the Unit – Students learn about shutter speed manipulation, and how it affects motion and light. Students will experiment with using a variety of shutter speeds to capture still motion and motion blur. Our featured photographer this week is Sebastião Salgado.
Description of the Unit – This is the second lesson of a seven-lesson photography unit, and for this lesson we are focused on aperture, and its effect on exposure and depth of field.
Description of the Unit – Students will embark on a seven-lesson photography unit, getting to know the way a camera works and how to use their settings, as well as understanding the elements and principles of design to achieve specific shots. Additionally, students will be introduced to formative photographers, both past and present, as inspiration for the subject of each lesson.